
Starting a yoga practice is an exciting step towards improving your physical and mental well being. It can be a bit overwhelming with so many poses and styles to choose from. However, the journey will start with a few elemental poses that will help you build a strong base. The right starting poses will introduce you to the practice in a gentle way, creating a practice that builds both flexibility and strength at a comfortable pace.
Yoga is not about twisting yourself up in a pretzel on day one. It is a slow process of listening to your body, respecting its limits and celebrating its progress. This guide is for basic yet powerful poses that are ideal for beginners! They will help you to unravel stiffness, build strength in your body that is functional and connect to your breath, which will set you up for a safe and rewarding long term practice.
Why Flexibility and Strength are Important
Flexibility and strength are two sides of the same coin with yoga. Flexibility ensures that your joints move through their full range of motion and that there is a reduced risk of injury and aches and pains. Strength provides the stability and support required to hold poses correctly as well as move with control. Together, they form a balanced body which feels able and strong.
As you start your practice, you will see improvements in both areas. Tense muscles will begin to release and a new sense of stability will be felt in your core, legs and arms. This combination is what makes yoga such an effective practice for overall physical health.
Basic Yoga Poses for Beginners
Here are a few great poses that are easy to do for beginners that have immense benefits for your foundation in yoga.
1. Mountain Pose (Tadasana)
This pose may look like you are just standing, but this is an active and fundamental pose for all of yoga. It teaches you proper alignment, balance and body awareness from the bottom up.
Benefits:
Mountain Pose is the Road Map to Good Posture. It strengthens the thighs and the ankles, firms the abdomen and helps you to find your center of gravity. It teaches you to be grounded yet strong right there in the present moment, which can carry over to being more confident off the mat.
How to Practice:
Stand with your big toe touching and heels slightly separated. Spread your weight across the sole of your feet. Contract your thigh muscles and pull them up but actually, don’t lock your knees. Stretch your tailbone down to the floor and draw your core in a little bit. Relax your shoulders down and away from the ears. Let your arms hang down at your sides, with the palm of your hands facing the front. Breathe deeply and hold it for 30 to 60 seconds.
2. Cat – Cow Stretch (Marjaryasana-Bitilasana)
This gentle flowing sequence is one of the best ways to warm up the spine as well as connecting your movement to your breath.
Benefits:
Cat-Cow helps to increase the flexibility of the neck, shoulders and spine. It also gently stretches the hips and the belly. The movement helps to release tension in the back and calm the mind making it a perfect place to start any practice.
How to Practice:
Starting in your hands and knees in table top position (wrists directly under shoulders, knees under hips). As you inhale (Cow Pose), lower your belly towards the mat, raise your chest and tailbone and look forward. As you exhale (Cat Pose), round your spine to the ceiling, tuck your chin to your chest and push the mat away from you. Flow in both of these poses for 5-10 cycles of breath.
3. Downward Facing Dog (Adho Mukha Svanasana)
Perhaps the most known yoga position, Downward-Facing Dog is a full-body stretch that builds strength as well as flexibility at the same time.
Benefits:
This pose strengthens the arms, shoulders and legs and stretches the hamstrings, calves and spine. It is a mild inversion and that means that it is helpful to increase blood flow to the brain which leaves you feeling energized.
How to Practice:
From hands and knees, tuck in toes and lift up and back with your hips to make an upside down ‘V’ shape. Spread your fingers about and keep pushing down into the mat. You can keep your knees bent at first to concentrate on lengthening out your spine. Pedal with your feet by bending one knee then the other to gently stretch your hamstrings. Hold for 5-8 breaths.
4. Warrior II (Virabhadrasana II)
Warrior II is a strong standing pose that helps build strength in the lower body as well as opens up the hips and chest. It develops concentration and endurance.
Benefits:
This pose strengthens and stretches legs, ankles and the groin. It has the swing of opening the chest and shoulders, and enhances endurance. Holding Warrior II involves focus, which helps to strengthen the mind. This is a core pose that is taught in every yoga school of good repute because of its power of building confidence.
How to Practice:
Step out your feet, about 3 or 4 feet apart. Turn your right foot out 90 degrees and the left foot in a little. Lines up your right heel with the arch of your left foot Bend your right knee until it is straight over your ankle. Extend your arms parallel to the floor actively in both directions. Cast your eyes at your right fingertips. Holding for 30 seconds, try the change to other side.
5. Triangle Pose (Trikonasana)
Triangle Pose: This is a great standing pose for increasing flexibility of the side body and strengthening of the legs.
Benefits:
It deeply stretches the hamstrings, groin, and hips as well as opens the chest and shoulders. The pose strengthens the legs, knees and ankles and aids in toning the abdominal muscles.
How to Practice:
Beginning in the same standing position as Warrior II. Extend your front (right) leg Hinge your right hip and reach forward and your right hand down to your shin, ankle or floor. Extend your left arm towards the ceiling. Keep both of your legs straight but not locked. Look up at your left hand if you feel comfortable with your neck turned up. Hold for 5 breaths then repeat for the other side.
6. Bridge Pose (Setu Bandhasana)
Bridge Pose is a gentle backbend which helps to open the front of the body and strengthen the back.
Benefits:
It strengthens the gluteus, hamstrings and back muscles and stretches the chest, neck and spinal areas. This pose can help reverse the effects of sitting for long periods of time. It also has a relaxing effect on the nervous system.
How to Practice:
Lie on your back with your knees bent, feet flat on the floor hip-width apart. Place your arms parallel with your body, palms down. Squeeze in your feet and arms to raise your hips up off of the ground. Try and hold your thighs parallel. For a deeper stretch you can hold your hands together underneath your back. Hold for 30 to 60 seconds.
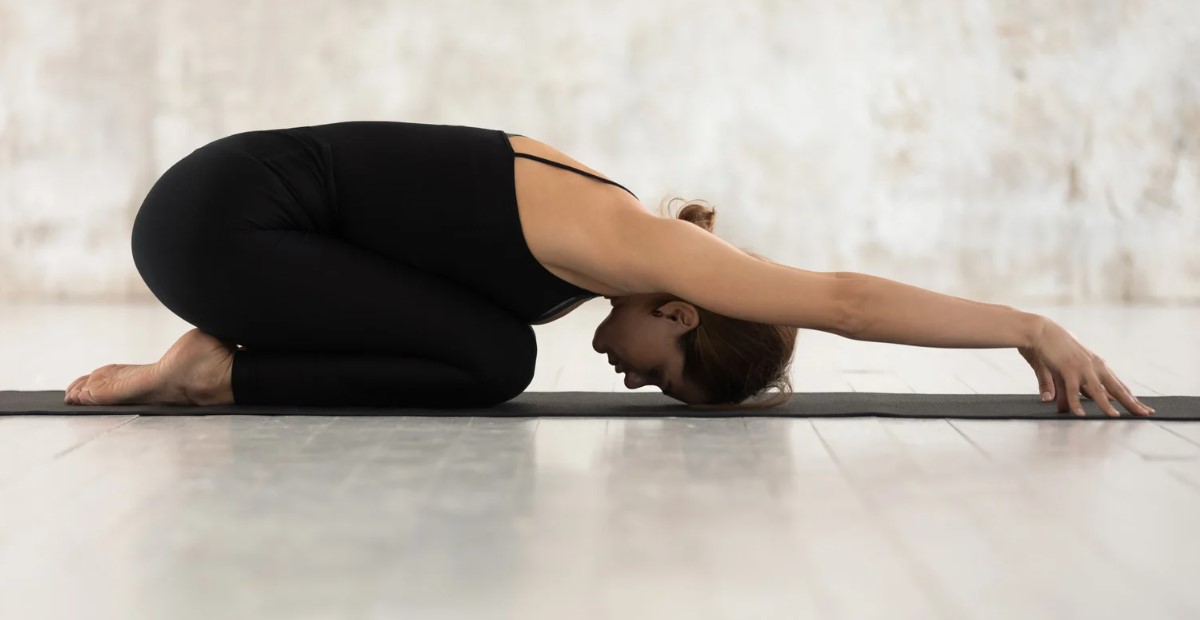
7. Child’s Pose (Balasana)
This is a resting pose, but this is an active stretch and every beginner should know this. It is your go-to pose, anytime you need a break during your practice.
Benefits:
Child’s Pose is a gentle way to stretch the hips, thighs and ankles, as well as to relieve pain in the back and neck. It is incredibly calming on the mind and helps to reduce stress and fatigue.
How to Practice:
Kneel down on the floor and, sitting back on your heels, fold forwards resting your forehead to the mat. Your arms can be extended in front of you or side down along your body with palms facing up. Breathing deep into your back. Stay here as long as you please. Anyone who is contemplating immersing themselves in an experience such as yoga teacher training in bali, will soon realize the value of this life-giving posturing.
Conclusion
Building flexibility and strength is a journey, not a destination. By including these seven beginning poses in a regular practice, you will make a strong, supple body and a calm and focused mind. Remember to be patient with yourself, listen to your body, and enjoy the process of finding out what you are capable of. Yoga is a practice of taking care of yourself and these are the perfect poses to start with.
You Might Also Like

