

HEADSTAND – SIRSHASANA
Definition: An asana in which you balance on your elbows, arms, and head
Known as the “King of Asanas” because of its many benefits, the Headstand is the first of the 12 asanas and is considered by many to be a panacea for countless human ills. Sitting and standing for most of the day causes your circulation to become sluggish, so your heart has to work harder to pump sufficient blood to the upper parts of your body. Normally, your heart works against gravity; inverting your entire body lessens the strain on your heart, and allows a plentiful supply of oxygen-rich blood to reach your head and brain. This pose is not an advanced asana; even so, to begin with you may wish just to undertake the child’s Pose and the Dolphin, progressing to the full Headstand later.
Objective: To relax and invigorate your entire body.
THE CHILD’S POSE
This is another relaxation pose, and is practised before the Headstand and some other asanas. Sit on your heels, then bring your forehead forward to rest on the ground. While in this pose, relax in order to prepare yourself mentally for the Headstand.
THE DOLPHIN
The Dolphin strengthens your upper body in preparation for the Headstand. Sit on your heels. Lay your elbows on the grounds, level with your shoulders, and position your arms as shown. Straighten your knees and stand on your toes. Rock your body back and forth. Do 4 rounds of 10 rocks, relaxing in between.
STEP 1 – ARMS & HANDS
Sit up on your heels, then catch hold of both your elbows with the opposite hands. Lean forward and lay your forearms on the ground, directly beneath your shoulders. Let go of your elbows, and clasp your hands together.
STEP 2 – HEAD DOWN
With your arms in the tripod position, above right, lower your head so that the top of your skull touches the ground and the back of it is cradled in your hands. Do not make any abrupt movements. Take the next steps slowly.
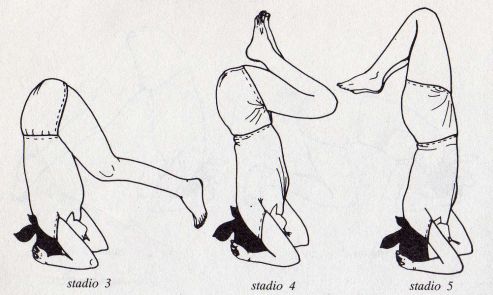
STEP 3 – ON YOUR TOES
From the crouched position with your head resting in your hands, straighten yoour knees and push your hips up above your head. Then, keeping your legs straight, stretch up high on your toes.
STEP 4 – HALF HEADSTAND
Now bend your knees, bringing them to your chest. Arch your back slightly, as you do when standing up; this will enable you to balance your body in this position. Do not proceed unless you can hold this position for at least 30 seconds without feeling any discomfort.>
STEP 5 – KNEES UP
With your knees still bent, start to straighten your hips. Slowly and carefully, raise your knees until they are pointing straight up toward the ceiling.
STEP 6 – ALL THE WAY
Straighten you knees and lift your feet up toward the ceiling. Support your weight by bracing your elbows against the ground. At first, hold the Headstand for 30 seconds; as you become more skilled at adopting this yoga pose, gradually increase the time to 3 minutes. Always come down before you start to feel tired. Leave the pose slowly and under control (see below). Head in Hands: Rest the back of your head against your hands. Relax, breathing through your nose.
COMING OUT
You should leave this Asana as carefully as you entered it. Do not move jerkily or quickly, or you may lose control and fall.
- Bend your knees and lower them.
- Straighten your legs. Bring your feet to the ground, and then lower your knees.
- Lower your body so that your buttocks rest on your heels as in the Child’s Pose.
- Finally, relax your hands and return to the full Child’s Pose.
- Do not lift your head up straight away. Rest for at least a minute.
- Relax in the Corpse before continuing
for more info join yoga teacher training in india
You Might Also Like

